Personal Illumination Page 1 Page 2 Page 3 Page 4 Page 5 Page 6
TO VIEW FULL SIZE IMAGES: USERNAME and PASSWORD are both "mm"
| 12/3/12 - The 'TM' in the name 'TM15' stands for 'Tiny Monster'. It's an appropriate description for this rechargeable searchlight from Nitecore as this thing packs quite a punch in a relatvely small package. It's only a little over 6" long and 2.3" in diameter, but it has a maximum output of 2450 lumens. Nitecore - Even if you're not a hardcore flashlight aficionado, but are generally familiar with flashlights, you'll know that there are a great variety of flashlight manufacturers, both domestic and foreign. I get a lot of generic spam mail from Asian-based LED/light manufacturers, offering their wares for sale, which I generally delete immediately. I recently received an email from Nitecore in China, and it caught my eye because it said 'review' in the subject line. When I read the email, it contained some generic information, but what set it apart from the rest was that it was written in decent grammar. No offense to anyone out there, but if an overseas company wants to do business in the U.S. and target U.S. consumers, using gramatically correct English goes a long way (no matter how good a product may be). It may be based more on perception than reality, but that's how it goes. I'm somewhat familiar with the major flashlight brands available, as I do like lights, but hadn't really paid much attention to the Nitecore brand. The next thing I did was to visit the Nitecore website. I was pleasantly surprised at what I saw, fully expecting to see a rudimentary site with few photos and reading like it had been translated automatically. The Nitecore website is on par or better than many US websites, and is full of high quality photography, graphics, and well-written specs and descriptions. Nitecore has definitely done their homework and employed the right people to make sure that their website makes a good impression on native English-speaking customers. After seeing this, it made me feel more confident about moving ahead and taking a look at their products. Nitecore is a subsidiary of SYSMAX and is focused on higher quality general-purpose illumination tools for the professiona, outdoor enthusiast, general user or sportsman. Now, I'm not an in-depth flashlight reviewer like some of the guys that specialize in flashlight-only reviews (find them on the candlepower forums). I do not have the specialized equipment (or knowledge) to measure outputs or runtimes or create graphs, nor the knowledge. I'm an engineer, yes, but a mechanical/aerospace one. Electrical engineering is just a dark mystery to me and was one of my weakest areas in college. So, if you're looking for very technical information, you'll find it quite easily by doing a search on the aforementioned forum. I'm writing from more of a general user point of view. Tiny Monster TM15 - The TM15 is one of two lights currently in the sporting/outdoor category of 'Tiny Monster' lights. The TM11 is a shorter light that came out before the TM15, with an output of 2000 lumens. I picked the new-for-2012 TM15 for review because it's the most powerful one they offer, and different from what I normally review (weapon or smaller lights). Let's start out with the manufacturer's features/specs on the TM15 -
Dimensions
Performance
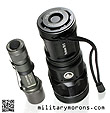
The TM15 comes packaged in a basic cardboard box with a foam insert with the warranty and instruction sheet. A 110V AC wall charger, lanyard, spare rubber O-ring and nylon pouch are included in the package. First impression - this is a pretty big flashlight. But that's comparing it to regular sized flashlights, not searchlights. Just for size comparison, I've shown it below next to a SureFire C2 Centurion. While it's quite a hefty light, it's nothing like the old D-cell Maglite I used to have two decades ago. It's most definitely small and handy enough for one-handed carry and to wear on a belt pouch. The anodizing is an attractive eggshell/satin black, and all the machining looks precise. It feels extremely solid.
|
|
Main external features - The TM15 head starts out with a stainless steel crenelated bezel ring, which doesn't really have any sharp edges or points, so I feel that it's more useful for allowing light to be seen if the light is accidentally turned on and it's been set facing down on its head, rather than as a striking instrument. The bezel protects the dual-side coated mineral glass lens to a certain extent. Just behind the bezel is a band of knurling. It's not very aggressive, and looks to be more of a cosmetic feature than one to add grip. Just behind the knurled band, the head has heat fins machined all around. They're pretty substantial (deep) and also have longitudinal scallops, which aid in the grip of the light. The scallops also function as anti-roll features, and prevent the light from rolling. At the 'bottom' of the head is a threaded insert, which is compatible with standard camera tripod mounts. Just behind that is a rubber plug that covers the recharging port (more on this later). The 'central' portion of the head/body also has heat fins machined into it, and they also aid in gripping the light. At the 'top' of this portion is the two-stage push button switch. It's a silver button surrounded by a band that lights up in blue (the power indicator). The button protrudes above the surface of the body, and doesn't have any fence around it (I'd like it to, actually). The 'body', or 'battery housing' has machined grooves on its forward portion, then a knurled portion with some smooth 'flats' further to the back. It's the same kind of knurling that's on the front of the head. There's some white lettering on the flats, like the manufacturer's logo, model, and warnings. The warnings are in tiny font, but still readable. Just from an aesthetic point of view, it'd look nicer if the lettering will all in the same font, but that's me being really picky. The tail has some non-functional machining at the back, which looks nice, and is flat so that the light can be stood on a flat surface. There's a lanyard hole in the tail, and the short length of thin cord that comes in the package is supplied as a lanyard installation aid. You double the cord, thread it though the lanyard hole in the tail, then use it to pull the lanyard through the hole. Otherwise, trying to push the lanyard loop through the hole is an exercise in frustration.
|
|
Looking at the front of the TM15, you can see the three cool white Cree XM-L LEDs housed at the bottom of their respective reflectors. The smooth reflectors look to be parabolic and quite deep for longer throw. On the TM15, the head is actually longer than the body, or makes up part of the body. The body is basically the battery housing, as seen in the photos below, and has separate battery compartments machined on the inside. A sticker inside each compartment indicates the correct orientation of the batteries. The negative contact at the bottom looks to be made of copper. Inside the bottom of the head, you can see a circuit board and two concentric rings (gold plated). The inner one is the positive contact and the outer one is the negative contact, which completes the circuit when the body is screwed on and the bare aluminum rim finally makes contact. Since the threads on the body are anodized, you can physically lock out the flashlight by loosening the body from the head about 1/4 turn (actually, 1/8 turn does it), breaking that contact. That way, the light cannot be accidentally turned on (more on this later). The body is sealed to the head with a large O-ring (that's what the extra O-ring supplied is for). The cool thing about this light is that you don't need a full complement of batteries for it to work. You can use anywhere from 1-4 18650 batteries, or 2-8 (in multiples of two) CR123 batteries. Runtimes will be shortened of course, and it isn't recommended that you use the turbo mode. Power Indicator light - The power indicator light provides information to the user by blinking. Its a blue ring that surrounds the 2-stage button. Here are the different blinking modes:
Charging - Rechargeable 18650 batteries can either be charged in an external charger, or inside the TM15 using the supplied wall charger. At the bottom of the light is a rubber-covered port where the wall charger plugs in. Under normal charging conditions, the power indicator light will blink twice a second. If there's a problem, charging will stop and the light will blink rapidly. This can be due to faulty batteries. When charging is complete, the blue light will remain on. Charging four completely depleted 18650 batteries takes approximately 7 hours.
|
|
Operation - The operation of the TM15 is relatively straightforward. The two-stage switch functions like a camera shutter button where you press it down partway to focus, then all the way down to take the picture. There are two modes: 'Daily mode' which cycles the light through ultra low, low, medium, and high brightness levels; and 'Turbo mode' with high and Turbo levels. Here's the summary of the operations. Starting with the light off:
With the light on:
Carrying the light - The included pouch is more of a holster, and only works on 2" wide belts. I wanted to see what other molle-compatible pouches the TM15 would fit, and found that an EMDOM double M4 mag pouch works well, and protects the light almost completely. For a 'quick access' pouch, the EMDOM 308 IAP fits the TM15 head-up. The M4 IAP will not work - it's too small. Of course, with an open-top pouch, the lens is left unprotected, so I'd carry it in a flapped pouch.
|
|
Intellicharge i4 - I requested an external charger along with the TM15 and chose the Intellicharge i4 (sold separately), which is a universal, automatic smart charger compatible with almost all types of rechargeable batteries. The i4 is able to automatically identify Li-ion, Ni-MH and Ni-Cd rechargeable batteries and apply an appropriate charging mode (Constant Charge Current (CC), Constant Charge Voltage (CV) and Trickle Charge). Each of the i4's four charging slots monitor and charge batteries independently. This means that you can charge batteries of different chemistries and voltages at the same time (in different slots). Each slot has its own status indicator lights, which visibly indicate battery status and charging process. The i4 automatically stops the charging process when complete. It also features reverse polarity protection. Specifications:
The i4 comes with a standard 110V AC plug and cable. The batteries I requested with the light were Nitecore's 2300 mAH NL183 Li-ion rechargeable batteries iwth integrated battery overcharge/discharge protection circuits. The body of the i4 is made of black plastic and has four battery slots with spring loaded negative contacts. There's a blue LED power indicator light at the upper right of the body. Right above each of the battery slots are three yellow LED indicator lights. The yellow LEDs will display battery status and blink when charging. A solid yellow LED means that the battery has charged up to that point (1/3 if the bottom LED is solid and the 2nd one is blinking etc). When charging is complete in that slot, all three LEDs will remain on without blinking. When four batteries are charged at the same time, each slot will receive a maximum output of 375mA. When one or two batteries are charged, each slot will receive a maximum output current of 750mA. Since the 750mA current exceeds the current that some Ni-MH/Ni-Cd AAA and 10440 Li-ion batteries can handle, AAA or 10440 batteries should always be charged in pairs. Note that slots #1 and #3 are paired, as are #2 and #4. So when charging two of there type of batteries, use slots #1 and #3, or #2 and #4. If you want to charge two batteries at the full current, put them in #1 and #2, or #3 and #4 slots.
|
|
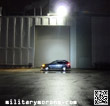
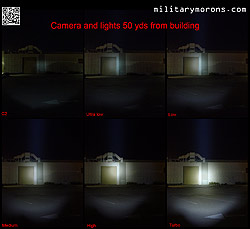
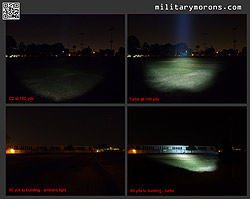
Notes and observations - Most people think that the TM15 looks like an oversized flashlight until you turn it on, then they realize that it's an undersized search light. It pretty much blows away most hand held and weapon lights that most folks are familiar with (it's not a fair comparison of course), and to find a light this bright, you've pretty much got to find someone who's a flashlight enthusiast (or someone who uses lights like this on the job). For someone like me who uses double CR123 lights almost exclusively, it feels pretty big. But considering the output of this light, it more than makes up for the size and heft. One thing I noticed was that the three LEDs glow faintly when the light is in standby or lockout mode in complete darkness. Nitecore states that while this is not by design, it does not affect the performance of the light. If you have a TM15 that does this, they'll replace it. It doesn't bother me, so I'm not going to have it swapped out. The lockout feature is important because the power button/switch is quite sensitive, and requires very little pressure to activate and turn on the light in daily mode. I sometimes find myself turning on the light inadvertently when grabbing it. I'd like to see a fence surround the switch so that it's protected and recessed, rather than protruding from the light head. The other alternative is to simply do a 'mechanical lockout' by rotating the body about a 1/8 to 14 turn. All it takes is a small twist, and the light cannot be turned on accidentally unless the body is tightened again. I actually find this more convenient than utilizing the lockout feature, as it does not require the light to be turned on first. It's the same as other flashlights that feature lockout tailcaps which require a small twist to deactivate and reactivate the light. I prefer this method of mechanical lockout when transporting the light, rather depending on an electronic lockout as there's zero drain. Operation of the light is pretty simple after a couple of times. It actually has less modes than many other pocket lights (with I think have too many). The strobe feature is different from other lights I have, because the frequency varies. It doesn't just flash at a set frequency, but varies it so that the speed of the strobe is ever changing. This is more distracting and effective (to the person on the business end of the light) than a set frequency strobe (in my opinion) since different people have different reactions to different frequencies. As far as I can tell, it does not repeat a particular pattern of flashing over and over. Outdoor shots - The TM15 is really too bright for indoor use on any level higher than medium, so I had to go outside to get some photos. I live in the city/suburbs, and it is truly difficult to find a place that is truly dark. There's always ambient light due to street lamps and buildings, and I'd have to go quite far to escape the city lights. The problem with going out to the desert is that it's devoid of structures to serve as size references, unless I stand in my own photos. So, I looked around for areas that I could use to illustrate/compare the different brightness levels of the TM15. In the set of photos below, the side of the building below is about 30 feet (3 stories) high. The rollup door is about 25 feet high. I snapped a photo on a different evening with a car for scale. Just for the sake of comparison, I brought along my SureFire Centurion C2 with a drop-in Lumens Factory D26-LED High Output Single Mode LED Reflector Module (3.6V-13V) that puts out about 300 lumens. The brightness of the C2's spot is about the same as the Low setting on the TM15 at 25 yds, which makes sense because they're both supposed to be putting out 300 lumens. The C2's beam is pretty tight, with much less spill. Moving out to 50 yds, this is where the C2's beam falls short of the same Low setting on the TM15. The TM15 has more throw, at the same brightness. I didn't take any indoor light shots, but the TM15's beam is free from artifacts and the hotspot looks very even when I shine it at a white ceiling or wall. At 50 yards, the TM15's hot spot beam is plenty bright and the spill beam lights up quite a bit of the parking lot. Note that in each of the series of photos below which compare the different brightness settings at the same distance, the camera was set on manual with the same ISO, aperture and shutter speed. I took multiple 'control' shots with different settings using ambient light before establishing the camera's settings, to try and match what I saw with the naked eye as accurately as possible. Distance was measured with a laser range finder.
|
|
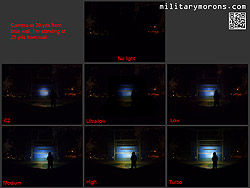
Wanting to try the TM15 at greater distances, I then went to large field that has two softball fields, and soccer fields, which allowed me to go out to about 150 yds. The first set of photos are taken with the camera at 30 yards and me standing at 25 yards away from the blue wall of a building, which is behind the backstop fence of the field. The chainlink fence reduces the light bouncing back from the wall, so it looks dimmer than it would if there weren't a fence in the way. I then skipped 50 yards, and went out to 100 yards away from the blue wall. In this set of photos, I have the camera on a tripod and I'm holding the light above the camera. At 100 yards, the C2 is out of range, and so is the Ultra Low and Low setting on the TM15. The Medium setting starts to get usable, while the High and Turbo settings are useful. In the third picture, I went out to 150 yds and snapped the C2 and the Turbo settings. The Turbo still reached all the way to the wall, and I could clearly see it. I then turned the camera on a low building about 80 yards away, showing both ambient lighting and the TM15 on Turbo. The last picture on the right was taken after some sodium lights came on to show the relative height of the blue wall and chain link fence. As a search light, the TM15 has a lot of throw to reach out over long distances. As a normal everyday light, it's a bit big and bright, but the lower settings are still definitely usable for closer tasks. Put it in a dark room, set it on its tail pointing it at the ceiling, and it'll light the room right up. When viewed from the other end, the light is painfully bright. If you're within 25 yards, you can't do much more than look away from the light and shield your eyes. Forget trying to advance towards the strobe in the dark. Overall, I'm pretty impressed with the TM15, and if it's representative of the rest of Nitecore's lights, I think that most users will be happy with the quality and performance.
|
Princeton Tec Charge MPLS and Byte
| 3/29/13 - Last year, Princeton Tec added the Charge to their MPLS (Modular Personal Lighting System) line. It's a natural evolution of the other personal task lights I've previouly featured, offering even more options than before and powered by a single readily available AA battery. Charge MPLS - I've featured some of Princeton Tec's MPLS lights before, like the Point and Switch; both small helmet lights with flexable necks. The Charge is a larger but more powerful helmet light, powered by an AA battery rather than a coin battery, and with more illumination options than the Point and Switch lights. The Charge was actually introduced early last year, but some small changes were made since then so I waited until the final production version came out. The prototype in black is shown below alongside the current version in tan. A small screw has been added to lock it into Ops-Core rails, rather than relying on the small tab that the proto had. The Charge MPLS kit comes with the following items: MICH helmet mount, MOLLE/PALS mount, and headstrap mount. The Charge is about 5.2" long with the head extended, and 1.9" tall. It weighs 47 grams with a battery (1.65 oz). The body of the Charge is cylindrical and houses a single AA (alkaline or lithium) battery, which is common worldwide. A trapdoor at the back opens up to allow the battery to be changed. It's O-ring sealed and water proof down to 1 meter for 30 minutes. The body is looks like it has an outrigger attached to it; this is the mount and switch housing. The outrigger mount has a dovetailed cross-section, which is designed to slide into Ops-Core rails on their FAST helmets. There's a spring-loaded ball bearing on the mount which holds it in place when slid onto the rail. The small screw on a tab can be tightened down for added security. The rubber membrane switch is located on the outrigger mount, and is easily located and activated when wearing gloves. It's recessed to prevent accidental activation.
|
|
The Charge has a total of four LED lights in the head - three 3mm Ultrabright LEDs clustered in a triangle around 1 Maxbright LED. The Maxbright LED is only available in white, while the Ultrabright LEDs are offered in green, blue, red, or IR. The Charge is available in six different combinations:
For this particular model (R/G/IR), the first press of the switch turns on the red Ultrabright LED. If the switch is pressed twice so the second press is within 1.5 seconds of the first press, the green Ultrabright LED will be lit. With either the red or green Ultrabright LEDs active, holding down the power button for two seconds will switch to Maxbright mode. If the Charge is off, nolding the power button down for two seconds will activate the single IR Ultrabright. If the light has been on for more than two seconds in any mode, pressing the button will turn the light off. Ultrabright - The Ultrabright LEDs emit a smooth, wide beam which is ideal for close to mid-range tasks. Using an Ultrabright LED only, the light will run 46 hours. The Ultrabright mode is suited more for reading in the dark or finding stuff in your tent - you can see the beam out to about 20 feet, but it won't illuminate much at that distance. It's just enough to find your way along in the dark. It has a wide spill. Maxbright - The Maxbright LED lives up to its name. It's pretty incredible how much illumination can come out of an LED nowadays, especially with a reflector. The Maxbright setting produces a narrower, more focused beam. Burn time is 4.5 hours. Advertised distance is about 90 feet for the Maxbright mode. The 1" elastic headstrap is comfortable and places the Charge on the side of your head. It's also possible to put it in the front, and use the flexible arm to point the head forward. The MOLLE/PALs mount requires a single row of PALS webbing and two columns. The mount can also be installed on any 1" webbing - vertical or horizontal.
|
|
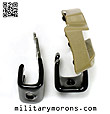
Helmet mounts - The Charge MPLS kit comes with a helmet mount with two metal U-clips to accommodate helmets of different thicknesses. The U-clip is first slid onto the bottom edge of the helmet. It can be adjusted by bending the clip with pliers if need be. The plastic mounting plate is then attached to the clip on the outside of the helmet and the two screws tightened until secure. The Charge is then slid onto the helmet. On the ACH helmet below, the Charge can also be installed on the Ops-Core ARC rail on the right side, with the Charge above the rail. The Charge is also shown below on the Ops-Core Bump shell, along with the Switch MPLS on the right side and the Remix in NVG mount in the front. The Charge is slid onto the FAST rail where the ball bearing engages the detents in the rail. The screw can also be tightened for more secure mounting. Now, the Charge fits on the Crye Airframe rail, but not optimally. The contour of the rail at the bottom forces the Charge partially out of the dovetail (see photo below), when mounted on the left side. Mounted on the right side is possible, but with the same issue. I have not had the Charge pop out of the rail on the Crye Airframe, but would love to see if made 100% compatible with it.
|
|
Byte Headlamp - The Byte is a small but powerful little headlamp. It's smaller and lighter than the Remix, and incorporates a single Red 3mm Ultrabright LED and one White Maxbright LED. It's powered by two AAA alkaline (included) or lithium batteries, and comes in Red (shown here), Black or White. The body (red portion) of the light rotates on the mounting plate (white), allowing the Byte to be angled up or down. It weighs 64 grams (2.26 ounces) with batteries installed.
|
|
To install the batteries, the battery door on the side is unlatched, and the door rotated open. A 3/4" elastic headband is supplied with the light, and slipped onto the slots in the mounting plate. The Byte has a single rubberized switch on to of the body, which is used to turn the light on and off, and cycle through the modes. The Byte has three modes - red, low and high. Pressing the switch turns on the red LED (it always comes on in red mode). Pressing it again turns off the red LED and turns on the white LED in the low setting. Pressing it once again turns on the high white LED setting. The red LED has a wide beam and range of about 6 yards. Burn time in the red setting is 146 hours. The low white LED setting extends the range to about 15 yards for a burn time of 96 hours, while the high setting reaches out to about 30 yards and a burn time of 2 hours. The switch cycles through all the modes each time it's turned on. It's a cool-looking little headlamp, and I recently used it while working underneath my car where I had very little headroom and no spare hands. I think that a headlamp with spare batteries is a must-have in every car - you never know when you're going to need one.
|
| 3/14/14 - The Tactical Balls (RID³) from Brite Strike Technologies are small illuminated rolling balls designed to be used by police officers without specialized training as distraction devices. They are meant to temporarily draw a perpetrator's attention away from the officer such that a move can be made to neutralize the threat. Description - The Tactical Balls (RID³ - Rolling Illumination Distraction and DIsorientation Device) come in a set of three, and are supplied with a black nylon pouch that holds the balls vertically, with a velcro-secured top flap. There's a velcro belt loop on the rear that will accommodate 3"- wide belts. The balls themselves measure 1.5" in diameter, and have a clear lens on top with two white LEDs inside. At the bottom is a rubberized push button on/off switch. They're weighted to cause wobble and spin while rolling, and face up when they come to a stop. The Tactical Balls each run on two 3V CR2032 Lithium watch batteries (included); the same kind that power Aimpoint T-1s. These are much more common nowadays and have come down in price over the years; you shouldn't pay more than a buck each online. Much less if bought in bulk. The bottom part of the Tactical Ball unscrews by twisting/unscrewing it off the top part. The two stacked batteries then can be removed from the compartment in the top part and replaced. The LED module also unscrews from the top part. It's a good idea to check periodically to ensure that it's screwed in snugly; repeated impact of the balls on hard surfaces can loosen it up a bit. The top and lower parts have an O-ring seal which keeps the compartment water-tight and prevents them from loosening up.
|
|
Notes and observations - The Tactical Balls have been out for a few years, but I've always been a bit curious about them. The two LEDs are rated at 10,000 MCD each (20,000 MCD total), which doesn't allow me to calculate the lumens without knowing the half-angle; but they're about as bright as those you find on common keychain LED lights. Not super-bright, but definitely bright enough to catch your attention when moving in the dark. The pouch isn't MOLLE compatible unless you want to hang it off only one row, or try to secure the velcro straps behind two rows of webbing which is pretty difficult. I'd have liked to see something MOLLE compatible so that it can be mounted on a rig vs. just a belt. That being said, the pouch works well. I looked for an alternative but didn't find a suitable replacement as the balls need to be loose enough to extract easily and quickly. How long the balls roll for depends of course on how much space is available, how hard they're rolled, and the type of surface. Most likely they'll be used in confined spaces and hit an object or wall that will cause them to stop. The main thing to remember is that on carpeting, they don't wobble after coming to a stop and won't usually stop facing up. On smooth surfaces, they'll keep wobbling for a lot longer, but depending on the surface or if they come to rest against something, they may not stop facing up either. To illustrate how the Tactical Balls work, I made a short video showing a number of trial throws on both carpet and concrete. Note that on the concrete driveway, it's sloping slightly to the right. As you can see in the video, no strobe feature is needed as the the spinning and wobbling creates somewhat of a strobe effect.
Another thing to take note of is that while durable, the Tactical Balls are not indestructable. They're shock-proof but not break-proof', especially on hard surfaces. The balls should be rolled like mini bowling balls; not lobbed like a hand grenade or thrown with force. I happened to drop one from about 4 feet up and it came apart, caused by a split in the main body. It still worked, though, but I wouldn't be throwing that one again. While extensive specialized training isn't really needed when deploying the Tactical Balls, some practice is definitely a good idea to get used to rolling or throwing them, and how hard to toss them. Deploying them also requires them to be turned on before tossing them, so this requires two hands to perform that task before they can be held in one hand, ready for use. Their name (RID³) includes both the words 'distraction' and 'disorientation' to describe the tactical balls. I'd definitely agree with the distraction part, as when they rolling, you can't help but notice them and look their way; but had to think a bit about the disorientation. 'Disorientation' implies loss of direction and confusion, but the Tactical Balls don't cause a loss of direction the same way a flash bang would. However, if their presence causes confusion for the target, simply because he's wondering what the hell they are, then I guess that term applies. Honestly, if someone tossed these things (or anything) into a dark room that I was hiding in, I'd be bracing myself for something to happen, like a big explosion or sound. That pause alone may be enough for police officers to rush in and take me out. The Tactical Balls can be used as a surprise tactic, but if so, the person throwing them in needs to be committed to immediate action as they only buy a few seconds of distraction before stopping. On the other hand, if they're thrown in and the perp is told that mini video cameras have been thrown in and his position is known and he's visible; that might be enough to shake his confidence. So, there are multiple ways the Tactical Balls can be deployed - some thought needs to go into it. For non-tactical use, the Balls can serve as little night lights in a tent, or basically any task that a keychain LED light works for. Thanks for opticsplanet.com for supplying these samples. |
ATTENTION! DO NOT LINK DIRECTLY TO MY IMAGES
/ . PLEASE
OBSERVE AND RESPECT OUR COPYRIGHT! . /
©opyright by MilitaryMorons.com. All Rights Reserved. Reproduction, Duplication,
Distribution Strictly Prohibited.
Unless mentioned otherwise, content and images are the
property of militarymorons.com and are not in the public domain.
They are not to be used without
permission. Please Contact
me for permission to use any images or content herein.


